

In the later versions of Sitecore i.e. 9.0 Update 2 and onwards, Sitecore has introduced a tool called Update Center which is used to manage the following tasks on Sitecore platform and Sitecore modules.


- Find the newer version
- Find the updates on the existing version
- Find the hotfixes if there are any
- Listing them on the Update Center dashboard
- Download and Install them
The Update Center can download and install the updates from a package in the file system using the Package Management Service.
You can find the Update Center tool on the Sitecore Launchpad.
 |
| Update Center listed under Control Panel category |
Click and open the Update Center and you will see all the available updates for the Sitecore Platform and modules under the respective category if there are any. For me, under Sitecore platform updates, it is listing Sitecore platform 9.2.0 as the update available as my current version is Sitecore 9.1.1.

On the above picture, on the left pane, the Updates option will be selected by default displaying updates on the Sitecore platform and Sitecore modules if there are any. On clicking on Installed modules, we can see all the installed updates.
If someone wants a custom module to be installed, they can use the Install Custom update option to select an update package from the file system.
On the right pane, we can see the Update version, prerequisites, and post-installation steps.
Another important option which we should know on Update Center is Enter update mode/ Exit update mode. This button toggles between Enter update and Exist update modes. Entering the update mode wizard takes a while and do not close or refresh the wizard window.
The below picture shows the Ready to Install window once we click on any updates listed on the Update Center. On the picture, you will see some information along with a checkbox to switch to update mode when installing. Sitecore recommends entering the update mode when you want to install updates.
The below picture shows the Ready to Install window once we click on any updates listed on the Update Center. On the picture, you will see some information along with a checkbox to switch to update mode when installing. Sitecore recommends entering the update mode when you want to install updates.

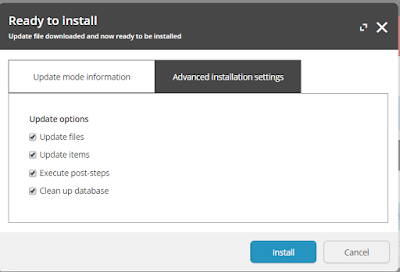
Advanced installation settings will give us update options to choose all or specific options to update when the update runs. The different options listed are shown in the below picture. After selecting the update options you can proceed with the installation by clicking on the Install button.

Installation of updates may take several minutes, wait for the wizard to complete the installation.
Please post your comments if there are any.
Please post your comments if there are any.
Thanks Mohan. Very informative and useful.
ReplyDeleteHow to take care of dependencies of Sitecore Dll's present in the Visual Studio Project ?
ReplyDeleteVery good article
ReplyDeletethanks for sharing this great content its Very informative and useful. It is very inspiring to read your post. Waiting for your updates.
ReplyDeleteoracle training in chennai
oracle training institute in chennai
oracle training in bangalore
oracle training in hyderabad
oracle training
hadoop training in chennai
hadoop training in bangalore